4.28.2010

Butter

A few weeks ago I decided to make butter. Yes, butter.


(Still at the whipped cream stage.)


My mom and other people have always said that if you make whipped cream and whip it too much you'll end up with butter. My mom also told me a story once about an elementary school teacher she knew who would bring in a quart of cream on the first day of school and make the kids shake it until it turned into butter, and then they would eat it on crackers.


(Maybe I should have stopped at this point?)


Well, John and I used cream to make something a while back and then weren't sure what to do with it. I decided to try beating it with the hand mixer until it turned into butter, because, you know, why not? We try not to cook with cream often and having a big thing of it in the fridge isn't going to lead to anything healthy. I guess butter still qualifies as unhealthy, but it gets used for lots of different things. And I like a good science experiment in the kitchen.


Like a lot of things I try to make, I should have read about this on the internet before actually trying it. Everything turned out fine, but it took a lot of faith. I used the hand mixer for a solid 15 minutes and throughout I kept thinking "This isn't going to work. Now I just have whipped cream soup."


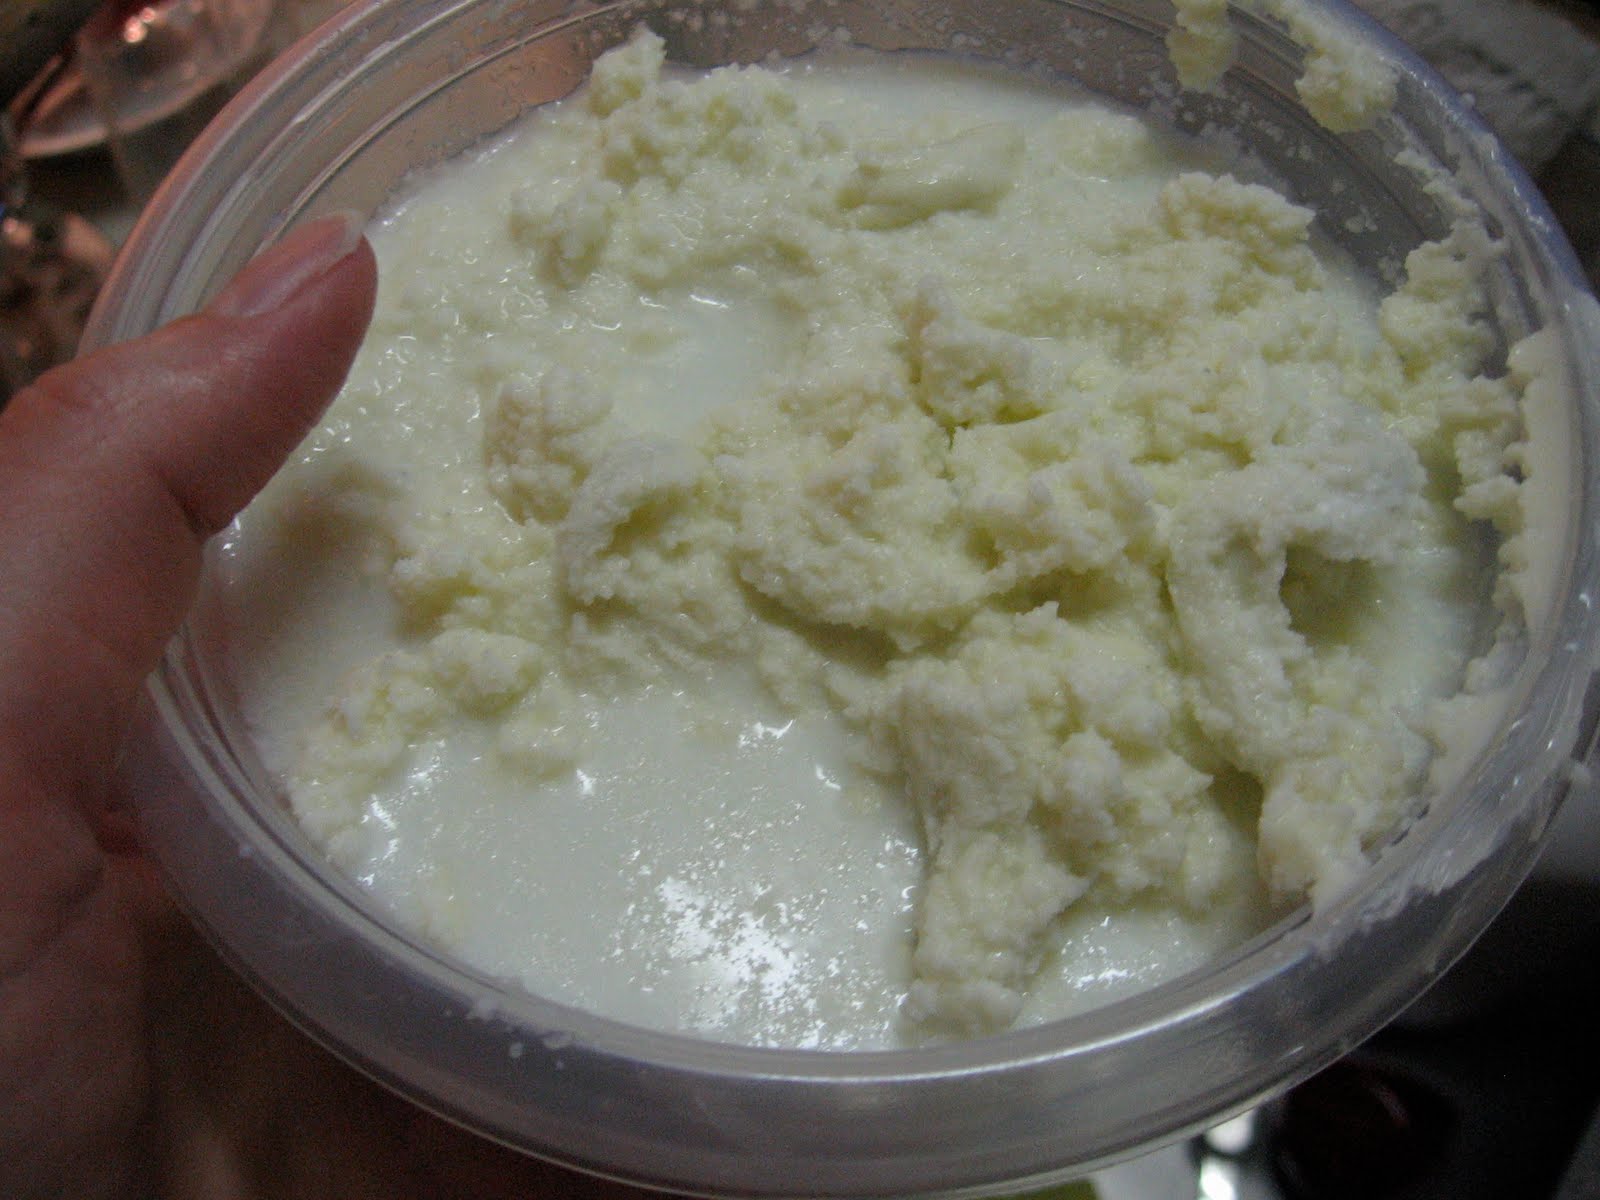
This is what I ended up with. For some reason, after 15 minutes or so, it went from being solid to producing liquid again. I have no idea why this happened, but the solids in there with the liquid are definitely butter, and I've used it a couple of times. It tastes really good, but a little more like cream than butter I've bought in a store. If you have any insights as to what the deal with the liquid was, I'd love to know! I've drained some of it off, and just let the rest stay. The experiment may not have gone perfectly, but it was fun, and I felt like I'd done a magic trick afterward.

4.27.2010

Aisha's Tips for Road Trip Food


This is my friend Aisha. She was part of my masters class at IU.


Here we are volunteering for the Obama rally two year ago.


As I scrolled through pictures to include in this post I realized that Aisha and I have spent a lot of time eating together.


It's only right that she should make a little appearance on this blog.


Yesterday she sent me an email with her own tips for eating while traveling, something she thought a lot about while on the road as an assistant to Lang Lang. With her permission I've decided to post her tips, some of which overlap with my post from yesterday. I'm not so into beef jerky, but hey, different strokes for different folks. I'm probably not the only one taking a trip this summer, so maybe one of you gentle readers will also find these helpful. Thanks, Aisha!


"Your question about road food was something I thought about a LOT when I was out with LL, especially because those 4 course meals at 5*+ restaurants made me fat (I know, I have such a rough life). Things that LL and I found really useful:

1. Fruit, always - it's a really good way to hydrate and feel like you're eating.
2. Beef jerky with seasonings. LL always ate this in the morning with a cup of tea and swears this is where he gets all his energy from.
3. Lara bars... they're vegan, they have like 3 ingredients, and they're realllly filling. Sometimes regular granola bars leave you hungry after 20 seconds.
4. Lattes over regular coffee.... especially because coffee makes you feel dehydrated, and the (soy) milk keeps you fuller.
5. Dried fruit and nuts. They keep really well.
6. Sabra makes these hummus and pretzel snack packs that are amazing - I don't know that it would work well driving, but they're super portable and delicious. Jif has individual serving sizes of peanut butter, too.
7. High-fiber or multi-grain instant hot cereal packets. Find paper cup, add hot water (from whatever roadside gas station that serves hot coffee), eat with a spoon.
8. Emer-gen-c packets to go with the water. You're not eating like you normally do, so you might not get all the vitamins you need, making you feel sluggish. Just try to only mix it with cold water or they're not as palatable.
9. Never underestimate the morale-boosting qualities of a hot meal at the end of the day. Pack light and graze through the day, but after a long day on the road, having a proper meal at a restaurant (even if it's Village Inn or something silly like that) just makes you less cranky."


Thanks for the tips! If anyone else has tips for road trip foods or eating well while traveling, send them my way at soundslikecanada at gmail dot com!

4.26.2010

Road Trip Prep

John and I have started to think about things we need to prep before our Road Tripstravaganza Oh-Ten (or whatever I called it before). Today I took a step toward keeping us from eating crap all the way from Sarnia to Atlanta and cleaned our trusty cooler.


It logged a lot of miles with each of us between Bloomington and Knoxville, but we haven't had much use for it since we moved to Canada. It has lots of pockets for things like napkins and utensils. It has a divider (in the drying rack, not shown) that we use to separate things like ice packs from strawberries, and drinks from things like sandwiches that drinks like to squish, etc.


It has this handy opening in the top so you can reach in and grab whatever is closest without having to unzip the whole thing, while turned around from the front seat, without a seat-belt. Being the co-pilot means being in charge of getting things out of the cooler, so it's much safer this way.


Cleaning the cooler made me think about what we will inevitably put in it. John and I have both been making an effort to eat less junk, and it's been paying off in terms of pounds. But that makes me nervous about all the hours on the road, tempted by things like Arbys and Chick-fil-A (both absent from Canada). We want to bring a lot of stuff with us to prevent the Arby's temptation from winning. Things like....

- sandwiches
- fruit of all kinds
- avocados
- cheese
- homemade granola and nuts from Bulk Barn (ok, not cooler items)!
- juice
- pasta salad
- yogurt
- water, water, and more water. Dehydration = hunger for me.


This article from one of my favorite blogs, Cheap Healthy Good, gives tips for various food related aspects of traveling (what to eat on your way there and once you get there). The interwebs certainly has a lot of good advice for eating on the road.

What about you? Any road trip foodie tips? What's your favorite thing to eat when you travel? What foods do you avoid eating when you travel? Leave me a comment or email me at soundslikecanada at gmail dot com, I'd love to know what you recommend!

4.14.2010

Quinoa Vegetable Soup

For all the simple ingredients in this soup I expected it to taste kind of bland. But it's really delicious and flavorful.


John and I have been trying out new recipes that involve quinoa, since we have some in the pantry. I've also got a great quinoa salad to show you at point soon. Quinoa is so funny to me - it starts out sort of like a mustard seed and then sort of...pops.


This soup is really hearty and the recipe makes a huge batch. We froze two tupperware containers of them for finals week (though, here we are and they're still frozen).
John didn't like the parsley in this soup, and in general I'd recommend putting it on top serving by serving, since it's kind of a strong flavor compared to the others. We made this with tofu instead of chicken. Sometimes I worry about that not turning out well, but here it was really good. Again, I recommend pressing the tofu for at least an hour before cooking - it makes all the difference!

Quinoa Vegetable Soup
adapted from The Sisters Cafe

2 T extra virgin olive oil
1 large onion, chopped
5 stalks celery, chopped
4 large carrots, peeled and sliced
2 Cups sweet pepper, chopped
1 large zucchini, quartered and sliced
64 oz chicken broth*
15 oz can diced tomatoes
5 medium Yukon Gold potatoes, scrubbed and cubed into 1" pieces (get the Yukon potatoes, it's worth the extra few dollars)
3 cups cooked quinoa
4 medium boneless skinless chicken breasts, cooked, shredded and lightly seasoned with salt and pepper* (We used a package of extra-firm tofu)
2 T Dijon Mustard
1 T Hot Sauce
Kosher Salt, fresh cracked black pepper, Garlic Salt (Lawry's is good), and Parsley to taste
1 1/2 cups fresh parsley chopped

Heat oil in a large pot over medium heat. Saute onion, celery, carrots, peppers, and zucchini until softened. This takes about 5 minutes. Stir in chicken broth, tomatoes, and potatoes. Increase heat to high just until broth starts to boil Reduce to medium high and cook potatoes for 10 minutes or until fork tender. Reduce heat to low and stir in quinoa, chicken, dijon mustard, hot sauce. Season to taste with kosher salt, pepper, garlic salt. Stir in fresh parsley and simmer until ready to serve.


*These are both ingredients that can easily be subbed for tofu and veggie broth to make this recipe vegan.

4.13.2010

Sesame Maple Ginger Tofu

For some reason all this healthy eating makes me really crave certain fatty foods - especially pizza and Chinese food. This tofu kind of hits that Chinese food spot, but without near as much grease.


The pictures are from the first time we made this, but we made it again the following week. For the second time, I added about 2 cups of steamed broccoli and made another batch of the sauce to cover that and the noodles. I found that rice noodles with a little sauce were a great compliment, and the broccoli added a little green to the whole thing. This is so flavorful and easy. I think it will become a regular part of our menu.


Sesame Maple Ginger Tofu
from Cara's Cravings

1 14-ounce block extra-firm water-packed tofu, rinsed, patted dry and cut into 1-inch cubes
1/4 tsp salt
1/4 tsp freshly ground pepper
1 tbsp tahini
1 tbsp reduced-sodium soy sauce
1 tsp sesame oil
1 tbsp pure maple syrup
1 tsp cider vinegar
1 tbsp sesame seeds and a generous pinch of ground ginger and crushed red pepper
*1-2 cups steamed broccoli florets
*6-8 oz rice noodles
Preheat oven to 475°F.

Spray a ceramic baking dish with nonstick cooking spray and add the tofu cubes; lightly spray with more nonstick cooking spray and season with salt & pepper. Roast for 10-12 minutes, or until the pieces of tofu are lightly browned on the bottom. Turn the pieces over, and roast for another 10 minutes.

Whisk tahini, soy sauce, sesame oil, maple syrup and vinegar in a small dish until combined. Remove the tofu from the oven, and toss with the tahini mixture and the sesame seeds (and ground ginger and crushed red pepper, if using.) Return to the oven and roast for another 5-10 minutes, turning once, until desired crispiness is reached.

*These were my additions, and they're totally optional. They really helped make it into a main dish.

4.12.2010

Coconut Lime Tofu

I think a while ago I said that I'm really into a blog called Cara's Cravings right now. John and I really love tofu, and that girl has some tasty recipes for it.


This recipe reminds me of a certain Thai soup that I love. It has a lot of similar flavors - tofu, coconut, lime, brown sugar, spinach. The soup version takes a lot longer to make than this tofu, which I hope to make again very soon.


Other than tofu, I had a few things to tell you. We have about a month before we head down to the Land of Freedom for 4 weeks or so. The first couple of stops: Fort Wayne, then Oxford, OH for Music Theory Midwest. I'm hoping that my desire to find good blog posts will prompt me to find good things to do in Fort Wayne for 2 weeks (!). Things other than just cooking and dog walking, of course. Before we head down there, we still have to administer a couple of exams, and John and I are both participating in the Forest City 5K Road Race on May 2nd. It's the first race I've entered since my epic ankle sprain of 2009.


Back to tofu.


We made some rice to have with this, and I added a little more coconut milk to it, just for kicks. A quick note - John and I like to press our tofu with something heavy to take some of the moisture out of it. We put it on a plate with a couple paper towels on either side of it, then stack either another plate with a canned good or a big canister of sugar on top. Doing this for a couple of hours before actually cooking it will firm it up even more and help it absorb flavor.


Coconut-Lime Tofu
from Cara's Cravings

Ingredients
1/2 cup light coconut milk
1/2 tsp coconut extract
2 jalapeno peppers, seeded and minced
1 tsp fresh ginger, peeled and minced
4 cloves garlic, minced
2 tsp soy sauce
1/4 cup lime juice
1 tbsp brown sugar
1 large tomato, seeded and diced
1 10oz package fresh baby spinach
1 lb firm tofu

Directions
Add the block of tofu to a pot of boiling water with about 1 tbsp salt. Let it simmer in the water for 5 minutes. Remove from the water onto a paper towel. Press out some of the water and chop into cubes.

In a shallow baking pan, stir together the coconut milk, coconut extract, jalapeno peppers, ginger, garlic, soy sauce, lime juice, and brown sugar.

Heat a skillet over medium high heat and add some nonstick cooking spray. Cook the tofu, turning occasionally, until browned on both sides. Remove from the skillet and add to the dish with the coconut milk. Toss to coat, and refrigerate for one hour.

Heat the skillet again over medium heat with nonstick cooking spray. Remove the tofu from the dish with a slotted spoon and add to the pan along with the tomato and spinach. Cook until spinach wilts, about 3-5 minutes. Add the marinade to the skillet, bring to a boil, then simmer for a few minutes until thickened.

Homemade Ricotta

Hello, gentle readers, it's been a while!


Our last day of class was last week and so this week is all about writing papers and chilling out as much as possible. Western's semester is only thirteen weeks and it feels pretty short compared to IU's fifteen. My first paper, an interpretation of Walter Benjamin's German-Jewish philosophy in the opera Shadowtime by Brian Ferneyhough, was due on April 6th. My next, a contextual, transformational analysis of Ligeti's piano etude "Arc-en-Ciel," isn't due until Friday, the 16th (doesn't music theory sound boring? It really isn't, at least not to me...thank God). Since it's almost done anyways, I thought now might be a good time to get back in touch with our blog.

And I thought the way to ease back in would be to show you a recipe I made about a month ago for homemade ricotta cheese.


It feels like a lot has happened since I made this cheese. The snow left completely, I bought sandals, health care passed, I sang a solo for Holy Saturday at church. You know. Big stuff. Especially the sandals.


This is what it looked like mid-boil. It didn't have enough boiling and clumping at first, so I added more lemon juice and that seemed to fix everything.


Ricotta is only one thing I learned this year that I wasn't expecting to. It turns out, I can do math, I've adjusted to milk in bags, I can make homemade cheese AND tortilla chips (!), and my research has a lot more to do with religion that I would have expected.


I know I made a big fuss on Facebook about not being able to find cheese cloth (it was surprisingly hard to find, like a lot of things in a Canadian grocery...coconut milk? Charcoal? Maple Syrup that doesn't cost $12?!). I actually could have made this with just the strainer, or our other, finer strainer. But it was nice to give it a good, final, squeeze in the cheese cloth before putting it away.


This ricotta was easy and delicious! We made a lot of stuff with it, and I ate a lot of it with berries or other fruit, both for breakfast and dessert.
The recipe I made is posted below. I recommend reading the linked post, since the author included a lot of helpful tips and her own experiences. This recipe makes about 1 cup of ricotta. I doubled it easily.

Homemade Ricotta
from Eggs on a Sunday

Ingredients
1 quart whole milk
1/2 cup heavy cream
1/4 tsp coarse salt (kosher or sea salt)
1 1/2 tablespoons lemon juice

Directions
Combine the milk, cream, and salt in a heavy saucepan. Separately, line a colander with cheesecloth and set it in a large bowl. Measure out the lemon juice and set it aside.

Bring the milk mixture to a simmer over medium high heat, stirring occasionally with a spatula to prevent scalding. Once the mixture has reached a steady simmer, add the lemon juice and stir gently with the spatula — quickly, just to blend. Let the mixture sit for about 1 minute, turning down the heat slightly so it stays at a simmer but doesn’t reach a hard, rolling boil. Stir with the spatula after about 1 minute, then let it sit another minute until it looks like most of the liquid has separated into curds and whey.

Drain the mixture into the cheesecloth-lined colander set over a bowl, and let it drain at room temperature for 1 hour. Transfer the ricotta to an airtight container and refrigerate.

Makes about 1 cup.